If the girl doesn’t go to Denis, then Denis will go to the girl. Using this rule, the young man left home, bought flowers and went to Nastya.
On the way from Denis’s house to the girl’s house is a road of n lines. This road can’t be always crossed in one green light. Foreseeing this, the good mayor decided to place safety islands in some parts of the road. Each safety island is located after a line, as well as at the beginning and at the end of the road. Pedestrians can relax on them, gain strength and wait for a green light.
Denis came to the edge of the road exactly at the moment when the green light turned on. The boy knows that the traffic light first lights up g seconds green, and then r seconds red, then again g seconds green and so on.
Formally, the road can be represented as a segment [0,n]. Initially, Denis is at point 0. His task is to get to point n in the shortest possible time.
He knows many different integers d1,d2,…,dm, where 0≤di≤n — are the coordinates of points, in which the safety islands are located. Only at one of these points, the boy can be at a time when the red light is on.
Unfortunately, Denis isn’t always able to control himself because of the excitement, so some restrictions are imposed:
He must always move while the green light is on because it’s difficult to stand when so beautiful girl is waiting for you. Denis can change his position by ±1 in 11 second. While doing so, he must always stay inside the segment [0,n]
He can change his direction only on the safety islands (because it is safe). This means that if in the previous second the boy changed his position by +1 and he walked on a safety island, then he can change his position by ±1. Otherwise, he can change his position only by +1. Similarly, if in the previous second he changed his position by −1, on a safety island he can change position by ±1, and at any other point by −1.
At the moment when the red light is on, the boy must be on one of the safety islands. He can continue moving in any direction when the green light is on.
Denis has crossed the road as soon as his coordinate becomes equal to n.
This task was not so simple, because it’s possible that it is impossible to cross the road. Since Denis has all thoughts about his love, he couldn’t solve this problem and asked us to help him. Find the minimal possible time for which he can cross the road according to these rules, or find that it is impossible to do.
Input
The first line contains two integers n and m, (1≤n≤106,2≤m≤min(n+1,104)) — road width and the number of safety islands.
The second line contains m distinct integers d1,d2,…,dm(0≤di≤n) — the points where the safety islands are located. It is guaranteed that there are 0 and n among them.
The third line contains two integers g,r(1≤g,r≤1000) — the time that the green light stays on and the time that the red light stays on.
Output
Output a single integer — the minimum time for which Denis can cross the road with obeying all the rules.
If it is impossible to cross the road output −1.
Examples
input
1
2
3
15 5
0 3 7 14 15
11 11
output
1
45
input
1
2
3
13 4
0 3 7 13
9 9
output
1
-1
Note
In the first test, the optimal route is:
for the first green light, go to 7 and return to 3. In this case, we will change the direction of movement at the point 7, which is allowed, since there is a safety island at this point. In the end, we will be at the point of 3, where there is also a safety island. The next 11 seconds we have to wait for the red light.
for the second green light reaches 14. Wait for the red light again.
for 11 second go to 15. As a result, Denis is at the end of the road.
In total, 45 seconds are obtained.
In the second test, it is impossible to cross the road according to all the rules.
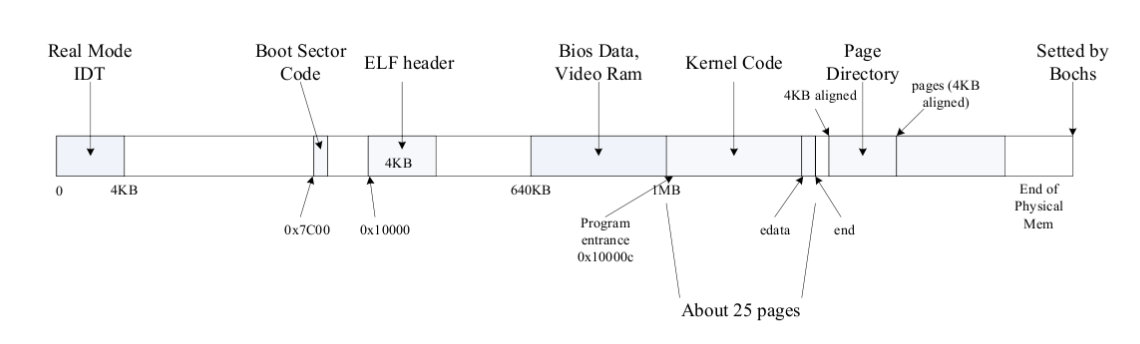
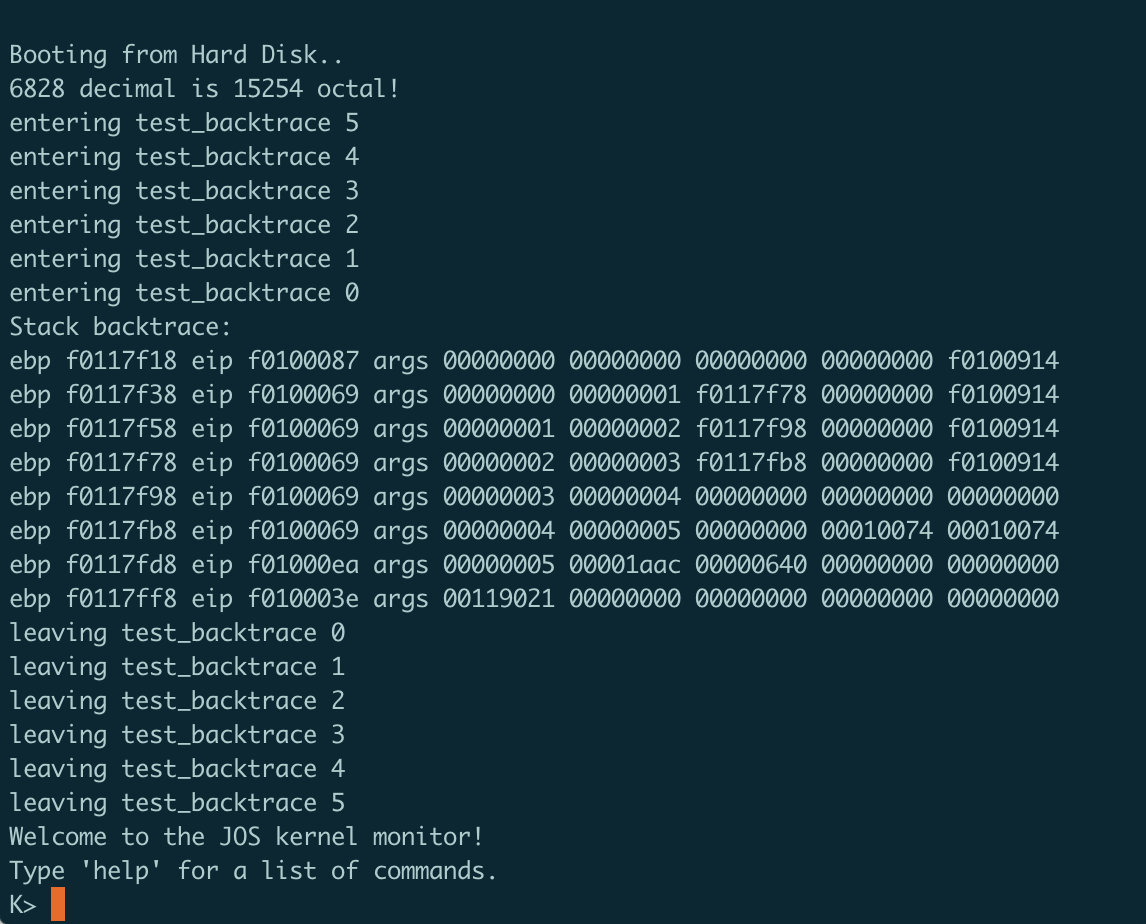
// Make 'envs' point to an array of size 'NENV' of 'struct Env'. // LAB 3: Your code here. envs = (struct Env *) boot_alloc(sizeof(struct Env) * NENV);
同时采用相似的方法将其map到UENVS处:
1 2 3 4 5 6 7 8 9
// Map the 'envs' array read-only by the user at linear address UENVS // (ie. perm = PTE_U | PTE_P). // Permissions: // - the new image at UENVS -- kernel R, user R // - envs itself -- kernel RW, user NONE // LAB 3: Your code here. n = ROUNDUP(NENV*sizeof(struct Env), PGSIZE); for (i = 0; i < n; i+=PGSIZE) page_insert(kern_pgdir, pa2page(PADDR(envs) + i), (void *)(UENVS + i), PTE_U | PTE_P);
// Mark all environments in 'envs' as free, set their env_ids to 0, // and insert them into the env_free_list. // Make sure the environments are in the free list in the same order // they are in the envs array (i.e., so that the first call to // env_alloc() returns envs[0]). // void env_init(void) { // Set up envs array // LAB 3: Your code here. memset(envs, 0, sizeof(struct Env) * NENV); int i; env_free_list = envs; for(i = 1; i < NENV; ++i) envs[i-1].env_link = envs + i;
// Per-CPU part of the initialization env_init_percpu(); }
// // Initialize the kernel virtual memory layout for environment e. // Allocate a page directory, set e->env_pgdir accordingly, // and initialize the kernel portion of the new environment's address space. // Do NOT (yet) map anything into the user portion // of the environment's virtual address space. // // Returns 0 on success, < 0 on error. Errors include: // -E_NO_MEM if page directory or table could not be allocated. // staticint env_setup_vm(struct Env *e) { int i; structPageInfo *p =NULL;
// Allocate a page for the page directory if (!(p = page_alloc(ALLOC_ZERO))) return -E_NO_MEM;
// Now, set e->env_pgdir and initialize the page directory. // // Hint: // - The VA space of all envs is identical above UTOP // (except at UVPT, which we've set below). // See inc/memlayout.h for permissions and layout. // Can you use kern_pgdir as a template? Hint: Yes. // (Make sure you got the permissions right in Lab 2.) // - The initial VA below UTOP is empty. // - You do not need to make any more calls to page_alloc. // - Note: In general, pp_ref is not maintained for // physical pages mapped only above UTOP, but env_pgdir // is an exception -- you need to increment env_pgdir's // pp_ref for env_free to work correctly. // - The functions in kern/pmap.h are handy.
// // Allocate len bytes of physical memory for environment env, // and map it at virtual address va in the environment's address space. // Does not zero or otherwise initialize the mapped pages in any way. // Pages should be writable by user and kernel. // Panic if any allocation attempt fails. // staticvoid region_alloc(struct Env *e, void *va, size_t len) { // LAB 3: Your code here. // (But only if you need it for load_icode.) // // Hint: It is easier to use region_alloc if the caller can pass // 'va' and 'len' values that are not page-aligned. // You should round va down, and round (va + len) up. // (Watch out for corner-cases!) void *start_va = ROUNDDOWN(va, PGSIZE); void *end_va = ROUNDUP(va + len, PGSIZE); void *cur_va; for(cur_va = start_va; cur_va < end_va; cur_va += PGSIZE) { structPageInfo * pp = page_alloc(0); if(!pp) panic("region_alloc: Out of memory!\n"); page_insert(e->env_pgdir, pp, (void *)cur_va, PTE_U | PTE_W); } }
// read 1st page off disk readseg((uint32_t) ELFHDR, SECTSIZE*8, 0);
// is this a valid ELF? if (ELFHDR->e_magic != ELF_MAGIC) goto bad;
// load each program segment (ignores ph flags) ph = (struct Proghdr *) ((uint8_t *) ELFHDR + ELFHDR->e_phoff); eph = ph + ELFHDR->e_phnum; for (; ph < eph; ph++) // p_pa is the load address of this segment (as well // as the physical address) readseg(ph->p_pa, ph->p_memsz, ph->p_offset);
// call the entry point from the ELF header // note: does not return! ((void (*)(void)) (ELFHDR->e_entry))();
bad: outw(0x8A00, 0x8A00); outw(0x8A00, 0x8E00); while (1) /* do nothing */; }
// // Set up the initial program binary, stack, and processor flags // for a user process. // This function is ONLY called during kernel initialization, // before running the first user-mode environment. // // This function loads all loadable segments from the ELF binary image // into the environment's user memory, starting at the appropriate // virtual addresses indicated in the ELF program header. // At the same time it clears to zero any portions of these segments // that are marked in the program header as being mapped // but not actually present in the ELF file - i.e., the program's bss section. // // All this is very similar to what our boot loader does, except the boot // loader also needs to read the code from disk. Take a look at // boot/main.c to get ideas. // // Finally, this function maps one page for the program's initial stack. // // load_icode panics if it encounters problems. // - How might load_icode fail? What might be wrong with the given input? // staticvoid load_icode(struct Env *e, uint8_t *binary) { // Hints: // Load each program segment into virtual memory // at the address specified in the ELF segment header. // You should only load segments with ph->p_type == ELF_PROG_LOAD. // Each segment's virtual address can be found in ph->p_va // and its size in memory can be found in ph->p_memsz. // The ph->p_filesz bytes from the ELF binary, starting at // 'binary + ph->p_offset', should be copied to virtual address // ph->p_va. Any remaining memory bytes should be cleared to zero. // (The ELF header should have ph->p_filesz <= ph->p_memsz.) // Use functions from the previous lab to allocate and map pages. // // All page protection bits should be user read/write for now. // ELF segments are not necessarily page-aligned, but you can // assume for this function that no two segments will touch // the same virtual page. // // You may find a function like region_alloc useful. // // Loading the segments is much simpler if you can move data // directly into the virtual addresses stored in the ELF binary. // So which page directory should be in force during // this function? // // You must also do something with the program's entry point, // to make sure that the environment starts executing there. // What? (See env_run() and env_pop_tf() below.)
// // Allocates a new env with env_alloc, loads the named elf // binary into it with load_icode, and sets its env_type. // This function is ONLY called during kernel initialization, // before running the first user-mode environment. // The new env's parent ID is set to 0. // void env_create(uint8_t *binary, enum EnvType type) { // LAB 3: Your code here. structEnv * e; if(env_alloc(&e, 0)) panic("env_create: env alloc failed!\n"); load_icode(e, binary); e->env_type = type; }
// // Context switch from curenv to env e. // Note: if this is the first call to env_run, curenv is NULL. // // This function does not return. // void env_run(struct Env *e) { // Step 1: If this is a context switch (a new environment is running): // 1. Set the current environment (if any) back to // ENV_RUNNABLE if it is ENV_RUNNING (think about // what other states it can be in), // 2. Set 'curenv' to the new environment, // 3. Set its status to ENV_RUNNING, // 4. Update its 'env_runs' counter, // 5. Use lcr3() to switch to its address space. // Step 2: Use env_pop_tf() to restore the environment's // registers and drop into user mode in the // environment.
// Hint: This function loads the new environment's state from // e->env_tf. Go back through the code you wrote above // and make sure you have set the relevant parts of // e->env_tf to sensible values.
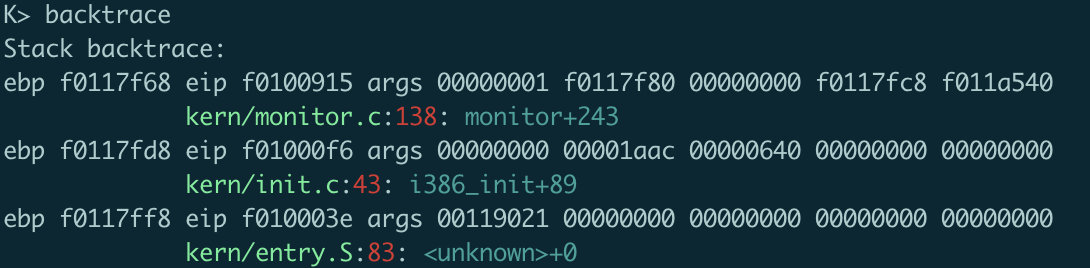
(gdb) b *0x800a33 Breakpoint 2 at 0x800a33 (gdb) c Continuing. => 0x800a33: int $0x30
Breakpoint 2, 0x00800a33 in ?? ()
发现确实执行到了这一条指令,以上的实现应该是没有问题。
Exercise 3
内容为阅读Chapter 9,是关于Exceptions和Interrupts的内容。
Exercise 4
从inc/trap.h当中可以发现,TrapFrame有着如下的结构:
1 2 3 4 5 6 7 8 9 10 11 12 13 14 15 16 17 18
structTrapframe { structPushRegstf_regs; uint16_t tf_es; uint16_t tf_padding1; uint16_t tf_ds; uint16_t tf_padding2; uint32_t tf_trapno; /* below here defined by x86 hardware */ uint32_t tf_err; uintptr_t tf_eip; uint16_t tf_cs; uint16_t tf_padding3; uint32_t tf_eflags; /* below here only when crossing rings, such as from user to kernel */ uintptr_t tf_esp; uint16_t tf_ss; uint16_t tf_padding4; } __attribute__((packed));
Divide error 0 No Debug exceptions 1 No Breakpoint 3 No Overflow 4 No Bounds check 5 No Invalid opcode 6 No Coprocessor not available 7 No System error 8 Yes (always 0) Coprocessor Segment Overrun 9 No Invalid TSS 10 Yes Segment not present 11 Yes Stack exception 12 Yes General protection fault 13 Yes Page fault 14 Yes Coprocessor error 16 No Two-byte SW interrupt 0-255 No
// Set up a normal interrupt/trap gate descriptor. // - istrap: 1 for a trap (= exception) gate, 0 for an interrupt gate. // see section 9.6.1.3 of the i386 reference: "The difference between // an interrupt gate and a trap gate is in the effect on IF (the // interrupt-enable flag). An interrupt that vectors through an // interrupt gate resets IF, thereby preventing other interrupts from // interfering with the current interrupt handler. A subsequent IRET // instruction restores IF to the value in the EFLAGS image on the // stack. An interrupt through a trap gate does not change IF." // - sel: Code segment selector for interrupt/trap handler // - off: Offset in code segment for interrupt/trap handler // - dpl: Descriptor Privilege Level - // the privilege level required for software to invoke // this interrupt/trap gate explicitly using an int instruction. #define SETGATE(gate, istrap, sel, off, dpl) \ { \ (gate).gd_off_15_0 = (uint32_t) (off) & 0xffff; \ (gate).gd_sel = (sel); \ (gate).gd_args = 0; \ (gate).gd_rsv1 = 0; \ (gate).gd_type = (istrap) ? STS_TG32 : STS_IG32; \ (gate).gd_s = 0; \ (gate).gd_dpl = (dpl); \ (gate).gd_p = 1; \ (gate).gd_off_31_16 = (uint32_t) (off) >> 16; \ }
// Dispatches to the correct kernel function, passing the arguments. int32_t syscall(uint32_t syscallno, uint32_t a1, uint32_t a2, uint32_t a3, uint32_t a4, uint32_t a5) { // Call the function corresponding to the 'syscallno' parameter. // Return any appropriate return value. // LAB 3: Your code here.
//panic("syscall not implemented");
switch (syscallno) { case SYS_cputs: sys_cputs((constchar *)a1, (size_t)a2); return0;
case SYS_cgetc: return sys_cgetc();
case SYS_getenvid: return sys_getenvid();
case SYS_env_destroy: return sys_env_destroy((envid_t)a1);
case NSYSCALLS: return0;
default: return -E_INVAL; } }
Exercise 8
在lib/libmain.c当中,进行env_id的指定:
1 2 3 4 5 6 7 8 9 10 11 12 13 14 15 16 17 18
void libmain(int argc, char **argv) { // set thisenv to point at our Env structure in envs[]. // LAB 3: Your code here. envid_t envid = sys_getenvid(); thisenv = &envs[ENVX(envid)];
// save the name of the program so that panic() can use it if (argc > 0) binaryname = argv[0];
// // Check that an environment is allowed to access the range of memory // [va, va+len) with permissions 'perm | PTE_P'. // Normally 'perm' will contain PTE_U at least, but this is not required. // 'va' and 'len' need not be page-aligned; you must test every page that // contains any of that range. You will test either 'len/PGSIZE', // 'len/PGSIZE + 1', or 'len/PGSIZE + 2' pages. // // A user program can access a virtual address if (1) the address is below // ULIM, and (2) the page table gives it permission. These are exactly // the tests you should implement here. // // If there is an error, set the 'user_mem_check_addr' variable to the first // erroneous virtual address. // // Returns 0 if the user program can access this range of addresses, // and -E_FAULT otherwise. // int user_mem_check(struct Env *env, constvoid *va, size_t len, int perm) { // LAB 3: Your code here. int newperm = perm | PTE_P; uint32_t cur_addr; pte_t * pte; for(cur_addr = (uint32_t)va; cur_addr < (uint32_t)(va + len); cur_addr = ROUNDDOWN((cur_addr+PGSIZE),PGSIZE)) { if(cur_addr >= ULIM) { user_mem_check_addr = cur_addr; return -E_FAULT; } pte = pgdir_walk(env->env_pgdir, (void *)cur_addr, 0); if((!pte) || ((*pte) & newperm) != newperm){ user_mem_check_addr = cur_addr; return -E_FAULT; } } return0; }
需要注意的是要在kern/syscall.c当中需要填充上有关检查的部分!
1 2 3 4 5 6 7 8 9 10 11 12 13 14 15
// Print a string to the system console. // The string is exactly 'len' characters long. // Destroys the environment on memory errors. staticvoid sys_cputs(constchar *s, size_t len) { // Check that the user has permission to read memory [s, s+len). // Destroy the environment if not.
// LAB 3: Your code here. user_mem_assert(curenv, s, len, PTE_W);
// Print the string supplied by the user. cprintf("%.*s", len, s); }
else { // The user-application linker script, user/user.ld, // puts information about the application's stabs (equivalent // to __STAB_BEGIN__, __STAB_END__, __STABSTR_BEGIN__, and // __STABSTR_END__) in a structure located at virtual address // USTABDATA. conststruct UserStabData *usd = (conststruct UserStabData *) USTABDATA;
// Make sure this memory is valid. // Return -1 if it is not. Hint: Call user_mem_check. // LAB 3: Your code here. if(user_mem_check(curenv, (void *)usd, sizeof(struct UserStabData), PTE_U)) return-1;
[00000000] new env 00001000 Incoming TRAP frame at 0xefffffbc Incoming TRAP frame at 0xefffffbc [00001000] user_mem_check assertion failure for va f010000c [00001000] free env 00001000 Destroyed the only environment - nothing more to do! Welcome to the JOS kernel monitor!
用户环境被销毁了,并且kernel没有panic,说明行为符合预期。
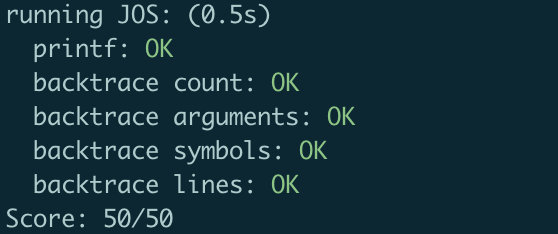
使用make grade命令可以得到如下结果:
1
2
3
4
5
6
7
8
9
10
11
12
13
14
15
16
17
18
divzero: OK (1.4s) softint: OK (1.4s) badsegment: OK (2.0s) Part A score: 30/30
faultread: OK (1.9s) faultreadkernel: OK (1.6s) faultwrite: OK (0.9s) faultwritekernel: OK (1.6s) breakpoint: OK (2.0s) testbss: OK (2.1s) hello: OK (1.8s) buggyhello: OK (1.7s) buggyhello2: OK (0.8s) evilhello: OK (1.6s) Part B score: 50/50
divzero: OK (1.4s) softint: OK (1.4s) badsegment: OK (1.6s) Part A score: 30/30
faultread: OK (0.9s) faultreadkernel: OK (1.5s) faultwrite: OK (2.0s) faultwritekernel: OK (1.6s) breakpoint: OK (0.9s) (Old jos.out.breakpoint failure log removed) testbss: OK (1.5s) hello: OK (1.6s) buggyhello: OK (1.0s) buggyhello2: OK (1.4s) evilhello: OK (1.6s) Part B score: 50/50
Score: 80/80
Challenge 2
Intel手册中12.3.1.4节为关于单步调试的相关内容:
This debug condition occurs at the end of an instruction if the trap flag (TF) of the flags register held the value one at the beginning of that instruction. Note that the exception does not occur at the end of an instruction that sets TF. For example, if POPF is used to set TF, a single-step trap does not occur until after the instruction that follows POPF.
[00000000] new env 00001000 Incoming TRAP frame at 0xefffffbc Incoming TRAP frame at 0xefffffbc Welcome to the JOS kernel monitor! Type 'help' for a list of commands. TRAP frame at 0xf0228000 edi 0x00000000 esi 0x00000000 ebp 0xeebfdfd0 oesp 0xefffffdc ebx 0x00000000 edx 0x00000000 ecx 0x00000000 eax 0xeec00000 es 0x----0023 ds 0x----0023 trap 0x00000003 Breakpoint err 0x00000000 eip 0x00800038 cs 0x----001b flag 0x00000046 esp 0xeebfdfd0 ss 0x----0023 K> continue Incoming TRAP frame at 0xefffffbc [00001000] exiting gracefully [00001000] free env 00001000 Destroyed the only environment - nothing more to do! Welcome to the JOS kernel monitor! Type 'help' for a list of commands. K>
#define wrmsr(msr,val1,val2) \ __asm__ __volatile__("wrmsr" \ : /* no outputs */ \ : "c" (msr), "a" (val1), "d" (val2))
从IA32的手册当中可以找到在使用SYSENTER之前所需要设置的相关内容:
IA32_SYSENTER_CS (MSR address 174H) — The lower 16 bits of this MSR are the segment selector for the privilege level 0 code segment. This value is also used to determine the segment selector of the privilege level 0 stack segment (see the Operation section). This value cannot indicate a null selector.
IA32_SYSENTER_EIP (MSR address 176H) — The value of this MSR is loaded into RIP (thus, this value references the first instruction of the selected operating procedure or routine). In protected mode, only bits 31:0 are loaded.
IA32_SYSENTER_ESP (MSR address 175H) — The value of this MSR is loaded into RSP (thus, this value contains the stack pointer for the privilege level 0 stack). This value cannot represent a non-canonical address. In protected mode, only bits 31:0 are loaded.
[00000000] new env 00001000 Incoming TRAP frame at 0xefffffbc hello, world i am environment 00001000 Incoming TRAP frame at 0xefffffbc [00001000] exiting gracefully [00001000] free env 00001000 Destroyed the only environment - nothing more to do!
对比原来的输出:
1 2 3 4 5 6 7 8 9 10
[00000000] new env 00001000 Incoming TRAP frame at 0xefffffbc Incoming TRAP frame at 0xefffffbc hello, world Incoming TRAP frame at 0xefffffbc i am environment 00001000 Incoming TRAP frame at 0xefffffbc [00001000] exiting gracefully [00001000] free env 00001000 Destroyed the only environment - nothing more to do!
可以发现由于在进行系统调用的时候没有采用int 0x30,所以这里在每次输出前并没有都进入trap()函数,使得少去了两行Incoming TRAP frame at ....的输出。
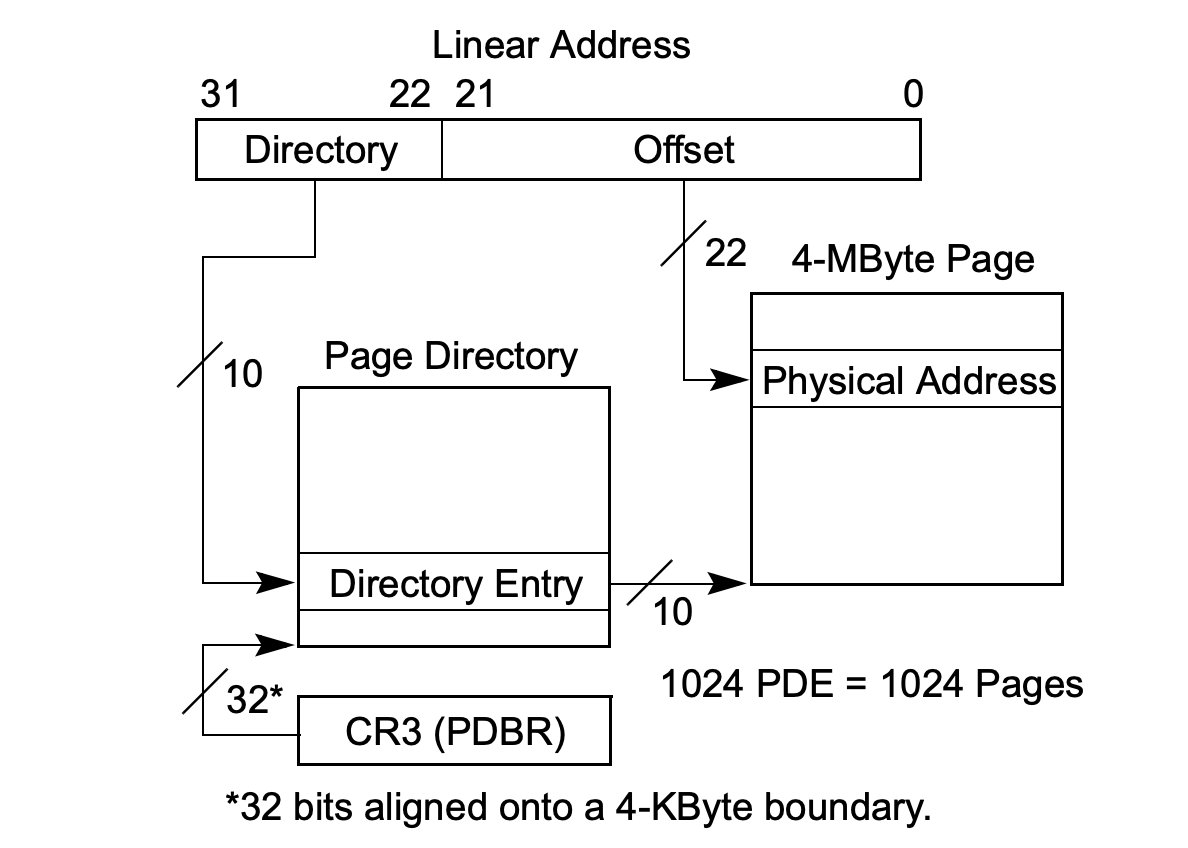
// A linear address 'la' has a three-part structure as follows: // // +--------10------+-------10-------+---------12----------+ // | Page Directory | Page Table | Offset within Page | // | Index | Index | | // +----------------+----------------+---------------------+ // \--- PDX(la) --/ \--- PTX(la) --/ \---- PGOFF(la) ----/ // \---------- PGNUM(la) ----------/
在inc/memlayout.h中可以看到PageInfo的结构如下:
1 2 3 4 5 6 7 8 9 10 11 12
structPageInfo { // Next page on the free list. structPageInfo *pp_link;
// pp_ref is the count of pointers (usually in page table entries) // to this page, for pages allocated using page_alloc. // Pages allocated at boot time using pmap.c's // boot_alloc do not have valid reference count fields.
// This simple physical memory allocator is used only while JOS is setting // up its virtual memory system. page_alloc() is the real allocator. // // If n>0, allocates enough pages of contiguous physical memory to hold 'n' // bytes. Doesn't initialize the memory. Returns a kernel virtual address. // // If n==0, returns the address of the next free page without allocating // anything. // // If we're out of memory, boot_alloc should panic. // This function may ONLY be used during initialization, // before the page_free_list list has been set up. staticvoid * boot_alloc(uint32_t n) { staticchar *nextfree; // virtual address of next byte of free memory char *result;
// Initialize nextfree if this is the first time. // 'end' is a magic symbol automatically generated by the linker, // which points to the end of the kernel's bss segment: // the first virtual address that the linker did *not* assign // to any kernel code or global variables. if (!nextfree) { externchar end[]; nextfree = ROUNDUP((char *) end, PGSIZE); }
// Allocate a chunk large enough to hold 'n' bytes, then update // nextfree. Make sure nextfree is kept aligned // to a multiple of PGSIZE. // // LAB 2: Your code here. if(npages * PGSIZE < (uint32_t)(nextfree + n - KERNBASE)) // out of memory panic("boot_alloc: We are out of memory.\n"); result = nextfree; nextfree = ROUNDUP(nextfree + n, PGSIZE);
由于在注释中要求要对于对于out of memory的情况需要触发panic,所以这里在34行进行了一个分配内容是否超过物理内存限制的检查。如果一切正常的话就进行分配,采用已经定义好的ROUNDUP宏来进行页面对齐。
如果n为0的时候,37行代码不会产生任何改变,符合注释中所描述的代码逻辑。
mem_init
1 2 3 4 5 6 7 8 9
// Allocate an array of npages 'struct PageInfo's and store it in 'pages'. // The kernel uses this array to keep track of physical pages: for // each physical page, there is a corresponding struct PageInfo in this // array. 'npages' is the number of physical pages in memory. Use memset // to initialize all fields of each struct PageInfo to 0. // Your code goes here:
// At IOPHYSMEM (640K) there is a 384K hole for I/O. From the kernel, // IOPHYSMEM can be addressed at KERNBASE + IOPHYSMEM. The hole ends // at physical address EXTPHYSMEM. #define IOPHYSMEM 0x0A0000 #define EXTPHYSMEM 0x100000
/* This macro takes a physical address and returns the corresponding kernel * virtual address. It panics if you pass an invalid physical address. */ #define KADDR(pa) _kaddr(__FILE__, __LINE__, pa)
staticinlinevoid* _kaddr(constchar *file, int line, physaddr_t pa) { if (PGNUM(pa) >= npages) _panic(file, line, "KADDR called with invalid pa %08lx", pa); return (void *)(pa + KERNBASE); }
// // Initialize page structure and memory free list. // After this is done, NEVER use boot_alloc again. ONLY use the page // allocator functions below to allocate and deallocate physical // memory via the page_free_list. // void page_init(void) { // The example code here marks all physical pages as free. // However this is not truly the case. What memory is free? // 1) Mark physical page 0 as in use. // This way we preserve the real-mode IDT and BIOS structures // in case we ever need them. (Currently we don't, but...) // 2) The rest of base memory, [PGSIZE, npages_basemem * PGSIZE) // is free. // 3) Then comes the IO hole [IOPHYSMEM, EXTPHYSMEM), which must // never be allocated. // 4) Then extended memory [EXTPHYSMEM, ...). // Some of it is in use, some is free. Where is the kernel // in physical memory? Which pages are already in use for // page tables and other data structures? // // Change the code to reflect this. // NB: DO NOT actually touch the physical memory corresponding to // free pages! size_t i; uint32_t pa_free_start = (uint32_t)((char *)boot_alloc(0) - KERNBASE); // case 1: pages[0].pp_ref = 1; pages[0].pp_link = NULL; // case 2, 3, 4: for (i = 1; i < npages; i++) { if(IOPHYSMEM <= i * PGSIZE && i * PGSIZE < pa_free_start) { pages[i].pp_ref = 1; pages[i].pp_link = NULL; } else { pages[i].pp_ref = 0; pages[i].pp_link = page_free_list; page_free_list = &pages[i]; } } }
// // Allocates a physical page. If (alloc_flags & ALLOC_ZERO), fills the entire // returned physical page with '\0' bytes. Does NOT increment the reference // count of the page - the caller must do these if necessary (either explicitly // or via page_insert). // // Be sure to set the pp_link field of the allocated page to NULL so // page_free can check for double-free bugs. // // Returns NULL if out of free memory. // // Hint: use page2kva and memset struct PageInfo * page_alloc(int alloc_flags) { // Fill this function in structPageInfo* alloc_page = page_free_list; if(alloc_page == NULL) returnNULL; page_free_list = alloc_page->pp_link; alloc_page->pp_link = NULL; if(alloc_flags && ALLOC_ZERO) memset(page2kva(alloc_page), 0, PGSIZE); return alloc_page; }
// // Return a page to the free list. // (This function should only be called when pp->pp_ref reaches 0.) // void page_free(struct PageInfo *pp) { // Fill this function in // Hint: You may want to panic if pp->pp_ref is nonzero or // pp->pp_link is not NULL. if(pp->pp_ref != 0 || pp->pp_link != NULL) panic("page_free: pp_ref or pp_link is not zero!\n"); pp->pp_link = page_free_list; page_free_list = pp; return; }
// Given 'pgdir', a pointer to a page directory, pgdir_walk returns // a pointer to the page table entry (PTE) for linear address 'va'. // This requires walking the two-level page table structure. // // The relevant page table page might not exist yet. // If this is true, and create == false, then pgdir_walk returns NULL. // Otherwise, pgdir_walk allocates a new page table page with page_alloc. // - If the allocation fails, pgdir_walk returns NULL. // - Otherwise, the new page's reference count is incremented, // the page is cleared, // and pgdir_walk returns a pointer into the new page table page. // // Hint 1: you can turn a PageInfo * into the physical address of the // page it refers to with page2pa() from kern/pmap.h. // // Hint 2: the x86 MMU checks permission bits in both the page directory // and the page table, so it's safe to leave permissions in the page // directory more permissive than strictly necessary. // // Hint 3: look at inc/mmu.h for useful macros that manipulate page // table and page directory entries. // pte_t * pgdir_walk(pde_t *pgdir, constvoid *va, int create) { // Fill this function in uint32_t pdx = PDX(va); uint32_t ptx = PTX(va); if(pgdir[pdx] == 0) { if(create) { structPageInfo* newpte = page_alloc(1); if(newpte == NULL) returnNULL; ++(newpte->pp_ref); pgdir[pdx] = page2pa(newpte) | PTE_P | PTE_W | PTE_U; } else returnNULL; } physaddr_t pte = PTE_ADDR(pgdir[pdx]) | (ptx << 2); return KADDR(pte); }
// // Map [va, va+size) of virtual address space to physical [pa, pa+size) // in the page table rooted at pgdir. Size is a multiple of PGSIZE, and // va and pa are both page-aligned. // Use permission bits perm|PTE_P for the entries. // // This function is only intended to set up the ``static'' mappings // above UTOP. As such, it should *not* change the pp_ref field on the // mapped pages. // // Hint: the TA solution uses pgdir_walk staticvoid boot_map_region(pde_t *pgdir, uintptr_t va, size_t size, physaddr_t pa, int perm) { // Fill this function in while(size > 0) { pte_t* pte = pgdir_walk(pgdir, (void *)va, 1); if(pte == NULL) panic("boot_map_region: Fail to alloc new page, run out of memory!\n"); *pte = pa | perm | PTE_P; size -= PGSIZE; va += PGSIZE, pa += PGSIZE; } }
// // Return the page mapped at virtual address 'va'. // If pte_store is not zero, then we store in it the address // of the pte for this page. This is used by page_remove and // can be used to verify page permissions for syscall arguments, // but should not be used by most callers. // // Return NULL if there is no page mapped at va. // // Hint: the TA solution uses pgdir_walk and pa2page. // struct PageInfo * page_lookup(pde_t *pgdir, void *va, pte_t **pte_store) { // Fill this function in pte_t* pte = pgdir_walk(pgdir, va, 0); if(pte == NULL) returnNULL; physaddr_t pa = PTE_ADDR(*pte); if(pte_store) *pte_store = pte; return pa2page(pa); }
// // Unmaps the physical page at virtual address 'va'. // If there is no physical page at that address, silently does nothing. // // Details: // - The ref count on the physical page should decrement. // - The physical page should be freed if the refcount reaches 0. // - The pg table entry corresponding to 'va' should be set to 0. // (if such a PTE exists) // - The TLB must be invalidated if you remove an entry from // the page table. // // Hint: The TA solution is implemented using page_lookup, // tlb_invalidate, and page_decref. // void page_remove(pde_t *pgdir, void *va) { // Fill this function in pte_t* pte_store; structPageInfo* pp = page_lookup(pgdir, va, &pte_store); if(pp == NULL) return; *pte_store = 0; page_decref(pp); tlb_invalidate(pgdir, va); }
// // Map the physical page 'pp' at virtual address 'va'. // The permissions (the low 12 bits) of the page table entry // should be set to 'perm|PTE_P'. // // Requirements // - If there is already a page mapped at 'va', it should be page_remove()d. // - If necessary, on demand, a page table should be allocated and inserted // into 'pgdir'. // - pp->pp_ref should be incremented if the insertion succeeds. // - The TLB must be invalidated if a page was formerly present at 'va'. // // Corner-case hint: Make sure to consider what happens when the same // pp is re-inserted at the same virtual address in the same pgdir. // However, try not to distinguish this case in your code, as this // frequently leads to subtle bugs; there's an elegant way to handle // everything in one code path. // // RETURNS: // 0 on success // -E_NO_MEM, if page table couldn't be allocated // // Hint: The TA solution is implemented using pgdir_walk, page_remove, // and page2pa. // int page_insert(pde_t *pgdir, struct PageInfo *pp, void *va, int perm) { // Fill this function in pte_t* pte = pgdir_walk(pgdir, va, 1); if(pte == NULL) return -E_NO_MEM; physaddr_t pa = page2pa(pp); ++(pp->pp_ref); if(*pte) page_remove(pgdir, va); *pte = pa | perm | PTE_P; return0; }
// Map 'pages' read-only by the user at linear address UPAGES // Permissions: // - the new image at UPAGES -- kernel R, user R // (ie. perm = PTE_U | PTE_P) // - pages itself -- kernel RW, user NONE // Your code goes here: n = ROUNDUP(npages*sizeof(struct PageInfo), PGSIZE); for (i = 0; i < n; i += PGSIZE) page_insert(kern_pgdir, pa2page(PADDR(pages) + i), (void *)(UPAGES + i), PTE_U | PTE_P);
// Use the physical memory that 'bootstack' refers to as the kernel // stack. The kernel stack grows down from virtual address KSTACKTOP. // We consider the entire range from [KSTACKTOP-PTSIZE, KSTACKTOP) // to be the kernel stack, but break this into two pieces: // * [KSTACKTOP-KSTKSIZE, KSTACKTOP) -- backed by physical memory // * [KSTACKTOP-PTSIZE, KSTACKTOP-KSTKSIZE) -- not backed; so if // the kernel overflows its stack, it will fault rather than // overwrite memory. Known as a "guard page". // Permissions: kernel RW, user NONE // Your code goes here: boot_map_region(kern_pgdir, KSTACKTOP - KSTKSIZE, KSTKSIZE, PADDR(bootstack), PTE_W);
// Map all of physical memory at KERNBASE. // Ie. the VA range [KERNBASE, 2^32) should map to // the PA range [0, 2^32 - KERNBASE) // We might not have 2^32 - KERNBASE bytes of physical memory, but // we just set up the mapping anyway. // Permissions: kernel RW, user NONE // Your code goes here: //cprintf("kernbase: %x 2^32-kernbase: %x", KERNBASE, (~KERNBASE)+1); boot_map_region(kern_pgdir, KERNBASE, (~KERNBASE) + 1, 0, PTE_W);
We have placed the kernel and user environment in the same address space. Why will user programs not be able to read or write the kernel’s memory? What specific mechanisms protect the kernel memory?
Revisit the page table setup in kern/entry.S and kern/entrypgdir.c. Immediately after we turn on paging, EIP is still a low number (a little over 1MB). At what point do we transition to running at an EIP above KERNBASE? What makes it possible for us to continue executing at a low EIP between when we enable paging and when we begin running at an EIP above KERNBASE? Why is this transition necessary?
# We haven't set up virtual memory yet, so we're running from # the physical address the boot loader loaded the kernel at: 1MB # (plus a few bytes). However, the C code is linked to run at # KERNBASE+1MB. Hence, we set up a trivial page directory that # translates virtual addresses [KERNBASE, KERNBASE+4MB) to # physical addresses [0, 4MB). This 4MB region will be # sufficient until we set up our real page table in mem_init # in lab 2.
# Load the physical address of entry_pgdir into cr3. entry_pgdir # is defined in entrypgdir.c. movl $(RELOC(entry_pgdir)), %eax movl %eax, %cr3 # Turn on paging. movl %cr0, %eax orl $(CR0_PE|CR0_PG|CR0_WP), %eax movl %eax, %cr0
# Now paging is enabled, but we're still running at a low EIP # (why is this okay?). Jump up above KERNBASE before entering # C code. mov $relocated, %eax jmp *%eax relocated:
# Clear the frame pointer register(EBP) # so that once we get into debugging C code, # stack backtraces will be terminated properly. movl $0x0,%ebp # nuke frame pointer
staticvoid boot_map_region_normal(pde_t *pgdir, uintptr_t va, size_t size, physaddr_t pa, int perm) { // Fill this function in while(size > 0) { pte_t* pte = pgdir_walk(pgdir, (void *)va, 1); if(pte == NULL) panic("boot_map_region: Fail to alloc new page, run out of memory!\n"); *pte = pa | perm | PTE_P; size -= PGSIZE; va += PGSIZE, pa += PGSIZE; } }
staticvoid boot_map_region_ex(pde_t *pgdir, uintptr_t va, size_t size, physaddr_t pa, int perm) { while(size > 0) { pte_t* pte = pgdir_walk_ex(pgdir, (void *)va, 2); if(pte == NULL) panic("boot_map_region: Fail to alloc new page, run out of memory!\n"); *pte = pa | perm | PTE_P | PTE_PS; size -= PTSIZE; va += PTSIZE, pa+= PTSIZE; } }
check_page_free_list() succeeded! check_page_alloc() succeeded! check_page() succeeded! check_kern_pgdir() succeeded! check_page_installed_pgdir() succeeded! Welcome to the JOS kernel monitor! Type 'help' for a list of commands. K>
题面中所说的"power-of-two allocation unit sizes from 4KB up to some reasonable maximum of your choice."应该就是伙伴系统了。感觉要完全实现除去修改自己写的函数之外需要修改check_page_free_list()以及kern/pmap.h当中的宏以及辅助函数,不知道会不会引发什么其他地方未知的错误,没有进行代码实现。
➜ lab git:(lab1) ✗ make + as kern/entry.S + cc kern/entrypgdir.c + cc kern/init.c + cc kern/console.c + cc kern/monitor.c + cc kern/printf.c + cc kern/kdebug.c + cc lib/printfmt.c + cc lib/readline.c + cc lib/string.c + ld obj/kern/kernel i386-jos-elf-ld: warning: section `.bss' type changed to PROGBITS + as boot/boot.S + cc -Os boot/main.c + ld boot/boot boot block is 382 bytes (max 510) + mk obj/kern/kernel.img
Exercise1
内容为阅读汇编的文档,进行了阅读,了解了内嵌汇编的语法格式。
Exercise2
逐步执行查看了运行过程,并且对于GDB指令进行了进一步的熟悉。
Exercise3
At what point does the processor start executing 32-bit code? What exactly causes the switch from 16- to 32-bit mode?
.globl start start: .code16 # Assemble for 16-bit mode cli # Disable interrupts 7d00: fa cli cld # String operations increment 7d01: fc cld
# Set up the important data segment registers (DS, ES, SS). xorw %ax,%ax # Segment number zero 7d02: 31 c0 xor %eax,%eax movw %ax,%ds # -> Data Segment 7d04: 8e d8 mov %eax,%ds movw %ax,%es # -> Extra Segment 7d06: 8e c0 mov %eax,%es movw %ax,%ss # -> Stack Segment 7d08: 8e d0 mov %eax,%ss
For the following questions you might wish to consult the notes for Lecture 2. These notes cover GCC’s calling convention on the x86.
Trace the execution of the following code step-by-step:
1 2
int x = 1, y = 3, z = 4; cprintf("x %d, y %x, z %d\n", x, y, z);
In the call to cprintf(), to what does fmt point? To what does ap point?
List (in order of execution) each call to cons_putc, va_arg, and vcprintf. For cons_putc, list its argument as well. For va_arg, list what ap points to before and after the call. For vcprintf list the values of its two arguments.
在对于cprintf()的调用当中,fmt指的是格式化的字符串,ap指向的是参数列表。
其中cons_putc()的内容如下:
1 2 3 4 5 6 7 8
// output a character to the console staticvoid cons_putc(int c) { serial_putc(c); lpt_putc(c); cga_putc(c); }
unsignedint i = 0x00646c72; cprintf("H%x Wo%s", 57616, &i);
What is the output? Explain how this output is arrived at in the step-by-step manner of the previous exercise.
The output depends on that fact that the x86 is little-endian. If the x86 were instead big-endian what would you set i to in order to yield the same output? Would you need to change 57616 to a different value?
得到的输出为:“He110 World”。
可以知道57616转换成16进制的结果为e110,所以前半部分得到的是He110。
后半部分对应ASCII码表可以知道:
由于小端法存储,0x00646c72的存储实际上是
1
72 6c 64 00
对应的字符串就是"rld\0",得到的后半部分为World。
如果改为大端法,对前半部分不会有影响,后半部分需要改成i = 0x726c6400。
In the following code, what is going to be printed after ‘y=’? (note: the answer is not a specific value.) Why does this happen?
Let’s say that GCC changed its calling convention so that it pushed arguments on the stack in declaration order, so that the last argument is pushed last. How would you have to change cprintf or its interface so that it would still be possible to pass it a variable number of arguments?
# Set the stack pointer movl $(bootstacktop),%esp f0100034: bc 00 80 11 f0 mov $0xf0118000,%esp
栈底的位置就是0xf0118000,从高地址往低地址生长。
同时在kern/entry.S的69行处可以看到:
1 2 3 4 5 6
relocated:
# Clear the frame pointer register (EBP) # so that once we get into debugging C code, # stack backtraces will be terminated properly. movl $0x0,%ebp # nuke frame pointer
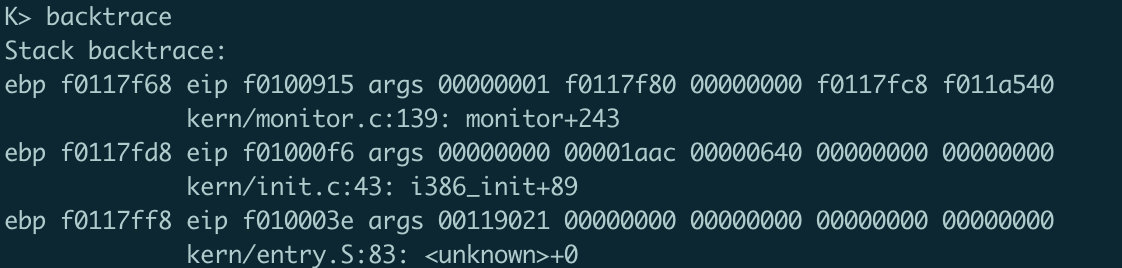
staticstructCommandcommands[] = { { "help", "Display this list of commands", mon_help }, { "kerninfo", "Display information about the kernel", mon_kerninfo }, { "backtrace", "Findout the the value of \%ebp, \%eip and the args of called functions", mon_backtrace}, };
1. What are wrong in the following code? Please point out.
1 2 3 4 5 6 7 8 9 10 11 12 13 14 15
voidmain() { char a = 'a'; int b = 0; int *pInt1 = &b; int c = *pInt1; pInt1 = (int*)(&a); int *pInt2 = pInt1 + 1; int d = *pInt2; void *pV = &a; // char * pV = &a; pV++; // 对空指针不能最算术运算 char e = *pV; }
2. What are wrong in the following code? Please provide your FIX.
Common.h
1 2 3 4 5
int var1; voidfoo(int input) { // some code }
TestA.h
1 2 3 4 5 6 7 8
#include"Common.h" #include"TestB.h"
classCTestA { private: CTestB m_b; };
TestB.h
1 2 3 4 5 6 7 8
#include"Common.h" #include"TestA.h"
classCTestB { private: CTestA m_a; };
TestA.cpp
1 2
#include"TestA.h" // some code
TestB.cpp
1 2
#include"TestB.h" // some code
提前声明,结构体内部都采用指针而不是实体。
C. STL
1. Errors, inefficiency and potential bugs exsit in the following code, please point them out.
intfoo(std::map<int, int>& mapIn, std::set<int>& setIn) { std::vector<int> va(10); std::vector<int> vb; std::copy(va.begin(), va.end(), vb.begin()); //std::vector<int> vb(va); std::vector<int> vc(100); auto iter = va.begin() + 5; int varInt = *iter; va.push_back(vc.begin(), vc.end()); varInt = *(++iter); if (mapIn[4] == 0) { // do something } auto itVec = std::find(vc.begin(), vc.end(), 100); if (itVec != vc.end()) { // do something } //auto itSet = setIn.find(10); //Set本来就是有序的结构,利用可以进行二分查找,效率更高 auto itSet = std::find(setIn.begin(), setIn.end(), 10); if (itSet == setIn.end()) { // do something } }
2. Please see the following code, TypeA could be either a function pointer or a functor, please try to provide the definition for TypeA in both function pointer way and functor way.
1 2 3 4 5 6
voidfoo(TypeA processor) { int paraInt = 0; constchar* pParaStr = "Test"; int rtn = processor(paraInt, pParaStr); }